前言 因為開始用 Obsidian 作筆記,在整理筆記的時候發現不少之前為了紀錄的文章其實可以發成 blog,畢竟很多我踩過的坑其實不是只有我在問,只是答案在一些很難找的地方 (ex:超長討論串的中間)。那不如就直接整理一下分享出來也不錯,畢竟我也不在意文筆不好等等,頂多有錯誤等等那我也不介意修改。
這篇文章因為包山包海,所以建議略讀之後就從目錄跳轉到需要的地方就好。
成品 就是這個網站啦,截個圖紀念一下:
hexo 端 基本配置 指令 本地測試:
1 hexo clean && hexo g && hexo s
ctrl + c 重開
_comfig.yml
基本資訊:標題、時區、作者、語言、頭貼、icon
檔案管理:
post_asset_folder: true 因為圖片影片都混在同一個資料夾真的很亂ignore:.DS_Store macOS 自動生成的惱人檔案
自訂主題:見 [[用 stellar 主題翻新 blog#Theme|主題]]
是一種訂閱網站內容的機制,只要網站有更新就會發送 「RSS Feed」的 XML 檔案( atom.xml ),使用者可以透過在 rss 閱讀器等地方輸入 RSS Feed 網址就能訂閱。
在 hexo 中,要先安裝 hexo-generator-feed
1 npm install hexo-generator-feed --save
並且在 _config.yml 中設定:
1
2
3
4
5
6
7
8
9
10
11
12
feed: enable: true type: atom path: atom.xml limit: 20 hub: content: content_limit: 140 content_limit_delim: ' ' order_by: -date icon: icon.png autodiscovery: true
僅為舉例,要調整詳見 GitHub README
Theme 在多方比較(可見 [[nice looking hexo theme|nice looking hexo theme]])後選定用 Stellar
這個主題除了一些小的額外設定,還引進 / 建構了幾個全新的系統 / 區塊
一般文章:直接放在 source/_posts 下就好
獨立文章:
位置:放在 source 下任何非底線路徑
menuid :
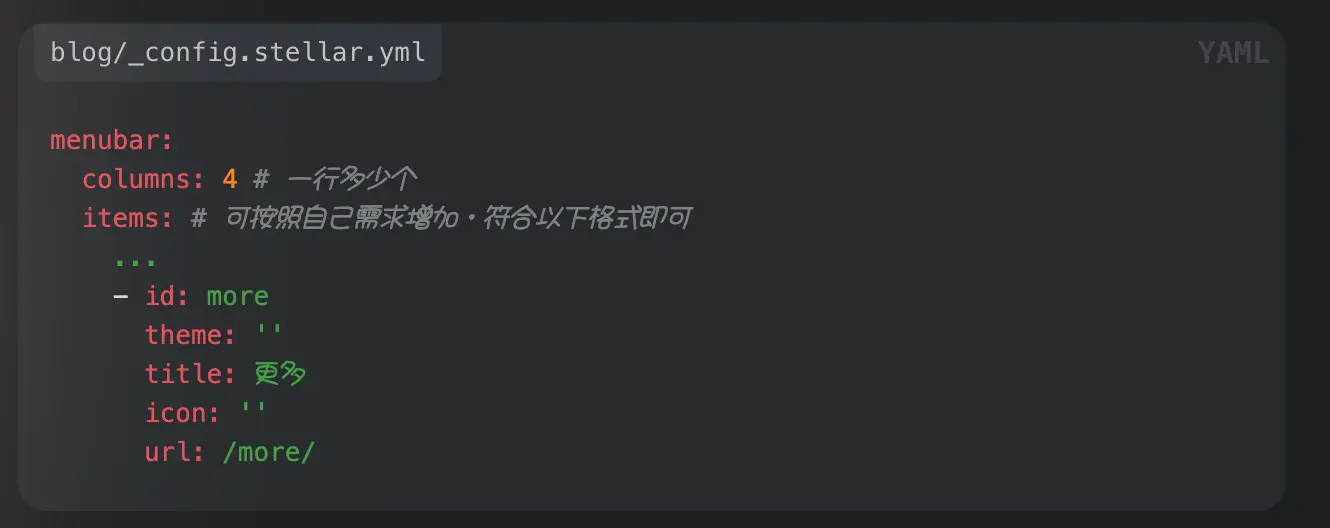
在 blog/_config.stellar.yml 中設定好 menubar :
from 编写文章以及独立页面
在頁面的 frontmatter 中設定
側邊欄組件 (widget)
每一個組件都要在 _data/widgets.yml 裡面建立,例:
配置的地方:『主題』、『項目』、『頁面』的設定,後者可以覆蓋前者
語法: leftbar: ['widget1', 'widget2'] (也可以是 rightbar)
也可以透過結構樹在 blog/_config.stellar.yml 裡面統一設定,見 此連結
注意:沒辦法在 markdown layout 中直接跑出 {{ var }} 形式的變數
解決方法:用 html 標籤,然後用 <script> 去控制 / 調整內文 ex:1 2 3 4 5 6 7 8 9 10 11 12 13 14 15 16 17 18 19 20 21 22 23 24 25 26 27 28 29 30 31 wordcount: layout: markdown title: ' 文章資訊' content: | - **本文字數**:<span id="post-word-count">計算中...</span> 字 - **預計閱讀**:<span id="post-read-time">計算中...</span> <script> (function() { function updateWordCount() { const article = document.querySelector('article.md-text') || document.querySelector('main'); if (!article) return; const text = article.innerText || article.textContent || '' ; const count = text.replace(/\s+/g , '' ).length; const minutes = Math.max(1 , Math.ceil(count / 300 )); const countEl = document.getElementById('post-word-count'); const timeEl = document.getElementById('post-read-time'); if (countEl) countEl.innerText = count.toLocaleString(); if (timeEl) timeEl.innerText = minutes + ' 分鐘' ; } if (document.readyState === 'loading' ) { document.addEventListener('DOMContentLoaded' , updateWordCount); } else { updateWordCount(); } })(); </script>
文檔系統 (wiki)
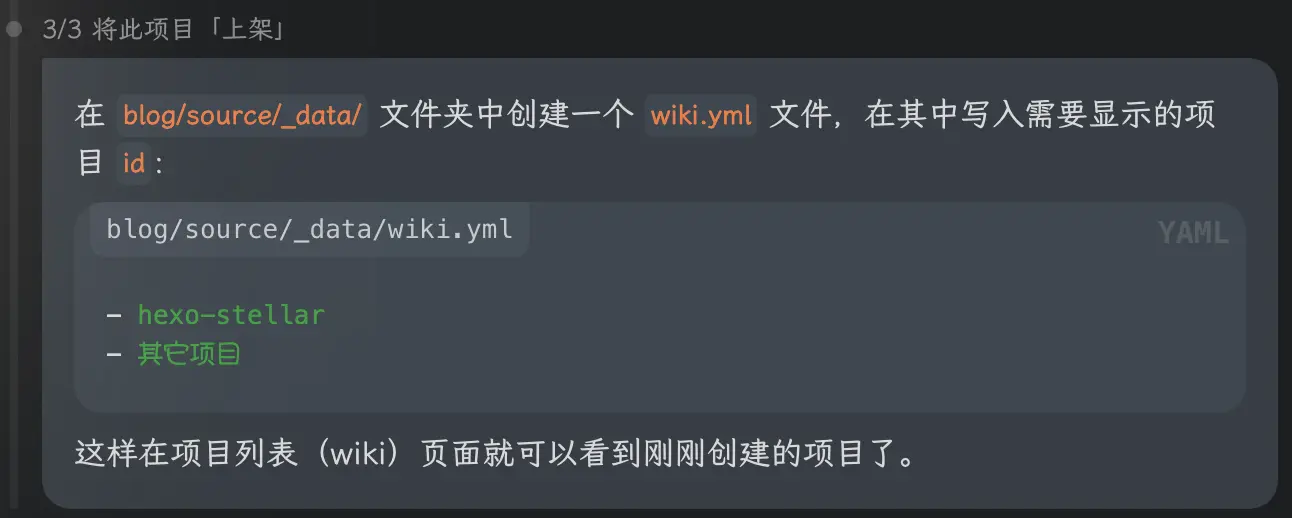
建立 blog/source/_data/wiki 資料夾,在資料夾下建立文件:
wiki.yml :宣告 / 上架所有的文檔項目 ex:<id>.yml :配置名為 “<id>“的文檔,基本上能配置的內容與 blog/_config.stellar.yml 差不多,詳見超連結
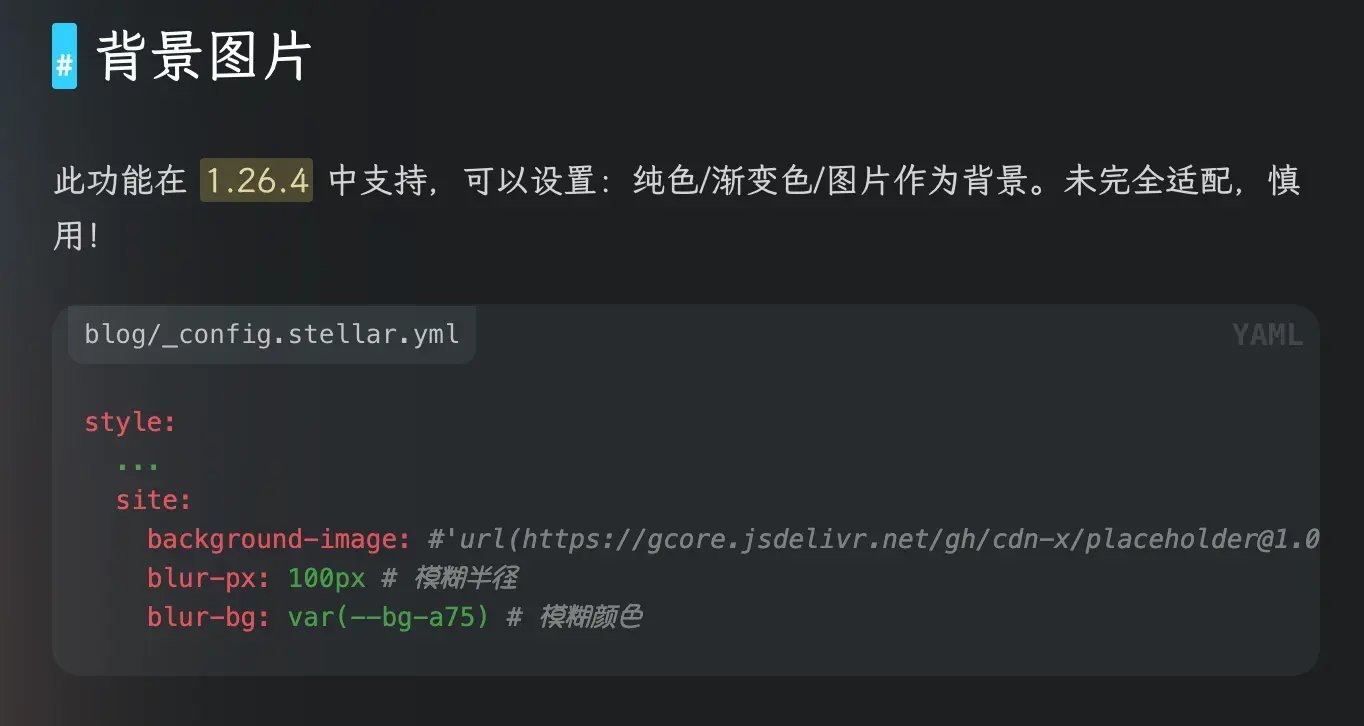
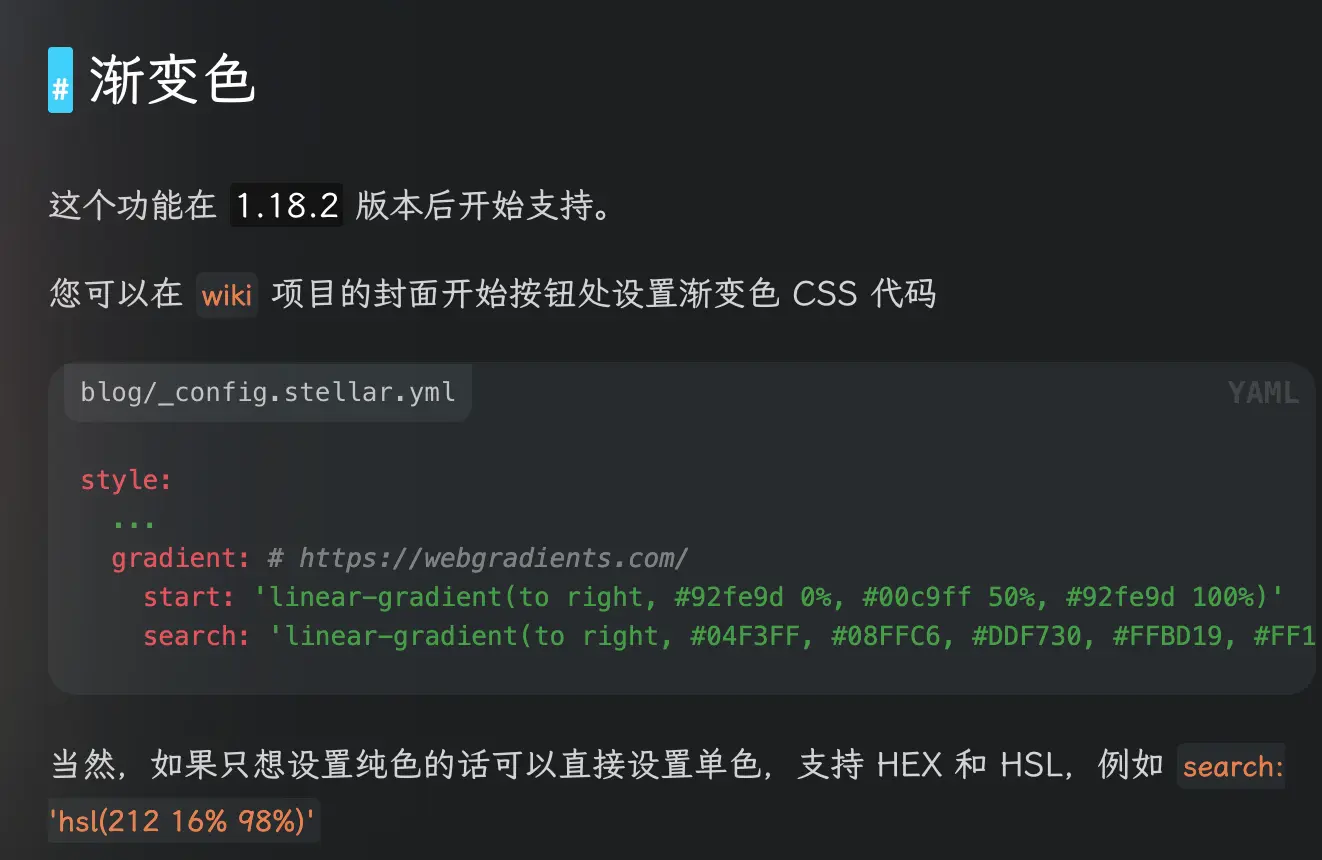
背景漸層
⬆️這邊有說背景可以可以做成漸層
⬆️這邊有漸層寫法
background-image 下就行了此 *
範例 主題的範例檔在此
( pjax 見此 )
顯示主題更新 1 2 {% timeline api:https://api.github.xaox.cc/repos/xaoxuu/hexo-theme-stellar/releases?per_page=1 %} {% endtimeline %}
Open Graph 就是分享連結得時候出現的描述 / 圖片
*取自 網路
API Limit 因為蠻多工具 / Widget 是與一些 API 有關,因此在架站的時候頻繁測試可能就會卡 rate limit
1 2 3 4 { "message": "API rate limit exceeded for XXX.XX.XXX.XXX. (But here's the good news: Authenticated requests get a higher rate limit. Check out the documentation for more details.)", "documentation_url": "https://docs.github.com/rest/overview/resources-in-the-rest-api#rate-limiting" }
友鏈
評論區 用 Giscus 這個工具,他本身是 github 裡面的 Application,然後把評論利用 API 以 disscuss 的形式存在 repo 裡面
基本上一般的只要照著 這個連結 作基本上就行了
還有其他的評論區工具可以見這裡:
(配置方法不保證通用)
Canonical URL
見 此
相關文章推薦 安装插件:
1 npm i hexo-related-popular-posts
_config.stellar.yml :
1 2 3 4 5 article: # npm i hexo-related-popular-posts related_posts: enable: true title: 您可能感兴趣的文章
文章設定 見此文
獨立頁面 主題有支援 / 常見的有
about
bookmark
explore
friends
rss
我的作法是把前面 example 的拉到 source 下來改
文章字數與所需閱讀時間 安裝:
1 npm install hexo-symbols-count-time --save
設置見 GitHub repo
語法轉換:Hexo Filter 因為主題功能與 Obsidian 插件都有各自的語法而且他們不互通,而且我的目標是可以把 obsidian 的文件直接用plugin 丟 Github 再靠action merge 進去我的網站,因此我就在找方法讓 hexo 能夠 parse obsidian 方面的語法。
這一個文章在解釋 hexo helper 這個玩意兒的作用,經過一番翻文檔跟 gemini,決定用 hexo filter 來代換語法。
踩坑1:文件存放位置 不管怎樣都是放在 blog/scripts/ (blog 指部落格整個資料夾)下
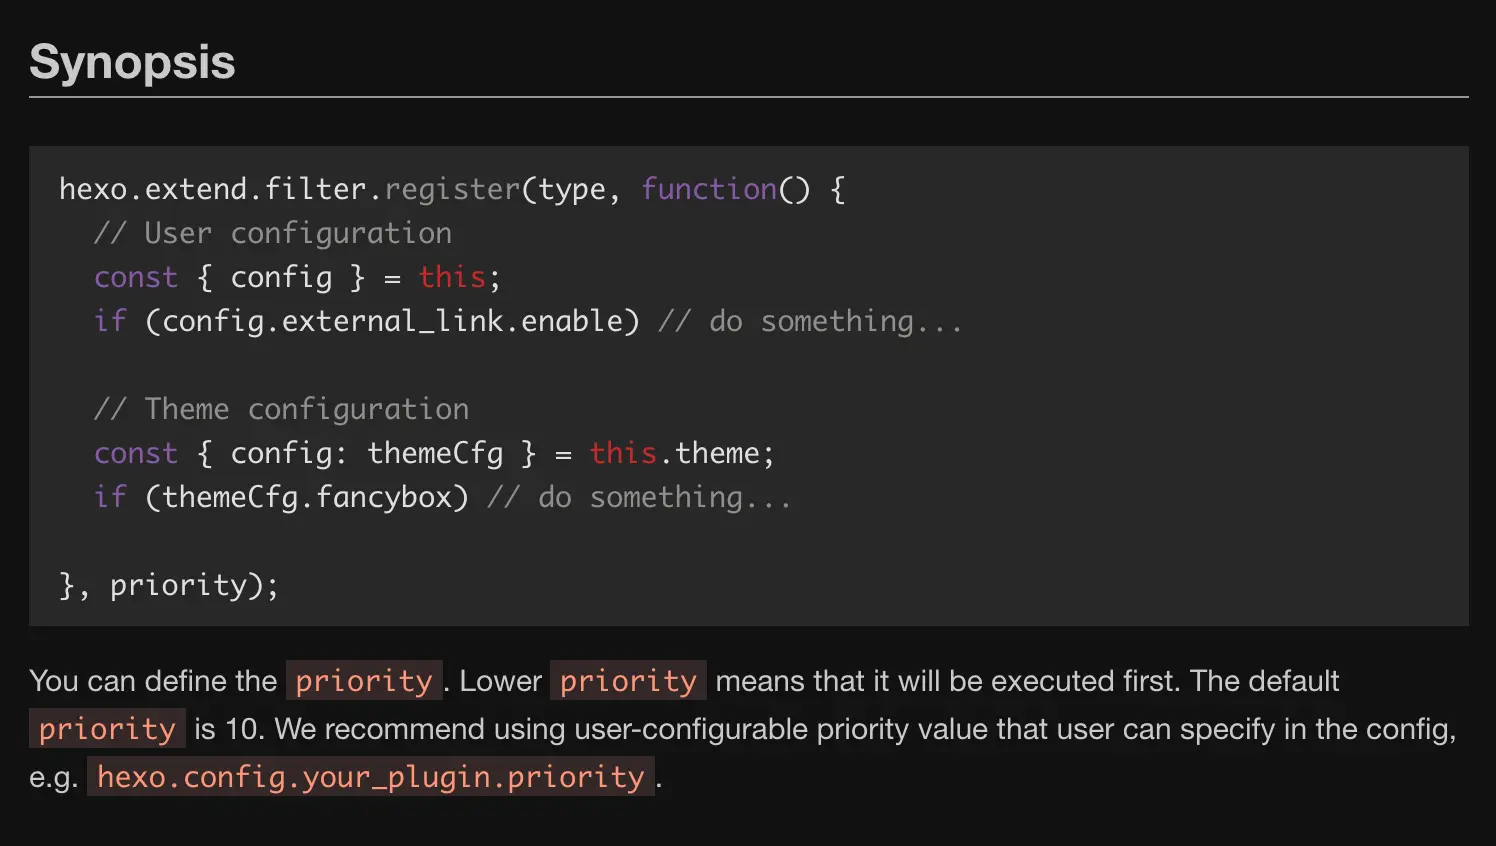
踩坑 1:Priority 文檔:
如果是自己寫的直接設成 1 就好,花了很久都沒成功大概是因為已經被主題的 scripts parse 壓掉了
code 2:link embed 為gemini生成後自己code view,謹慎使用
配合stellar功能:link 链接卡片
程式碼
1 2 3 4 5 6 7 8 9 10 11 12 13 14 15 16 17 18 19 20 21 22 23 24 25 26 27 28 29 30 31 32 33 34 35 36 37 38 39 40 41 42 43 44 45 46 47 48 49 50 51 52 53 54 55 56 57 58 59 60 61 62 63 64 65 66 67 68 69 70 71 72 73 74 75 76 77 78 79 80 81 82 83 84 85 86 'use strict' ; console .log ('====== [Embed Plugin] 腳本已成功載入 ======' ); function parseEmbedYaml (content ) { const lines = content.split (/\r?\n/ ); const data = {}; for (let i = 0 ; i < lines.length ; i++) { const line = lines[i].trim (); if (!line || line.startsWith ('#' )) { continue ; } const colonIndex = line.indexOf (':' ); if (colonIndex === -1 ) { continue ; } const key = line.slice (0 , colonIndex).trim (); let value = line.slice (colonIndex + 1 ).trim (); if ( (value.startsWith ('"' ) && value.endsWith ('"' )) || (value.startsWith ("'" ) && value.endsWith ("'" )) ) { value = value.slice (1 , -1 ); } data[key] = value; } return data; } function convertEmbedToLinkTag (blockContent ) { const data = parseEmbedYaml (blockContent); const href = data.url ? data.url .trim () : '' ; const rawTitle = data.title ? data.title .trim () : '' ; const iconUrl = data.image ? data.image .trim () : (data.favicon ? data.favicon .trim () : '' ); const titlePart = rawTitle ? `"${rawTitle.replace(/"/g, '\\" ')}"` : ' '; const iconPart = iconUrl ? `icon:${iconUrl}` : ' '; // const descPart = ' desc:true '; // 想要 description 可以打開 const parts = [' link', href]; if (titlePart) { parts.push(titlePart); } if (iconPart) { parts.push(iconPart); } // parts.push(descPart); // 想要 description 可以打開 console.log(parts.join(' ')); return `{% ${parts.join(' ')} %}`; } // 註冊至 before_post_render,優先級設為 1 (最先執行) hexo.extend.filter.register(' before_post_render', function(data) { if (!data || !data.content) { return data; } const regex = /``` embed\s*[\r\n]+([\s\S]*?)```/gi; let matchCount = 0; const newContent = data.content.replace(regex, function(match, blockContent) { matchCount++; const result = convertEmbedToLinkTag(blockContent); console.log( `[Embed Debug] 成功轉換 ${data.source} 的第 ${matchCount} 個區塊為 :\n ${result}` ); return result; }); if (matchCount > 0) { data.content = newContent; } return data; }, 1);
1 2 3 4 5 6 ``` ### code 2:images embed obsidian 圖片語法: ``` markdown {% image "/images/directory" width:alias %}
stellar 支援語法:
1 {% image src [description] [download:bool/string] [width:px] [padding:px] [bg:hex] [fancybox:bool/string] %}
踩坑 2: 在測試的時候發現有部分圖片顯示不出來,發現是因為路徑包含空格所以標籤被解析的時候分開了
程式碼
1 2 3 4 5 6 7 8 9 10 11 12 13 14 15 16 17 18 19 20 21 22 23 24 25 26 27 28 29 30 31 32 33 34 35 36 37 38 39 hexo.extend .filter .register ('before_post_render' , function (data ) { if (!data || !data.content ) { return data; } const obsidianImageRegex = /!\[\[([^\]\|]+)(?:\|([^\]]+))?\]\]/g ; data.content = data.content .replace (obsidianImageRegex, (match, imagePath, params ) => { const cleanPath = imagePath.trim (); if (!params) { return `{% image "/images/${cleanPath} " %}` ; } const cleanParams = params.trim (); if (/x/i .test (cleanParams)) { const [rawWidth, rawHeight] = cleanParams.split (/x/i ).map ((item ) => item.trim ()); const width = /^\d+$/ .test (rawWidth) ? `${rawWidth} px` : rawWidth; const height = /^\d+$/ .test (rawHeight) ? `${rawHeight} px` : rawHeight; return `{% image "/images/${cleanPath} " width:${width} height:${height} %}` ; } else { const width = /^\d+$/ .test (cleanParams) ? `${cleanParams} px` : cleanParams; return `{% image "/images/${cleanPath} " width:${width} %}` ; } }); return data; }, 1 );
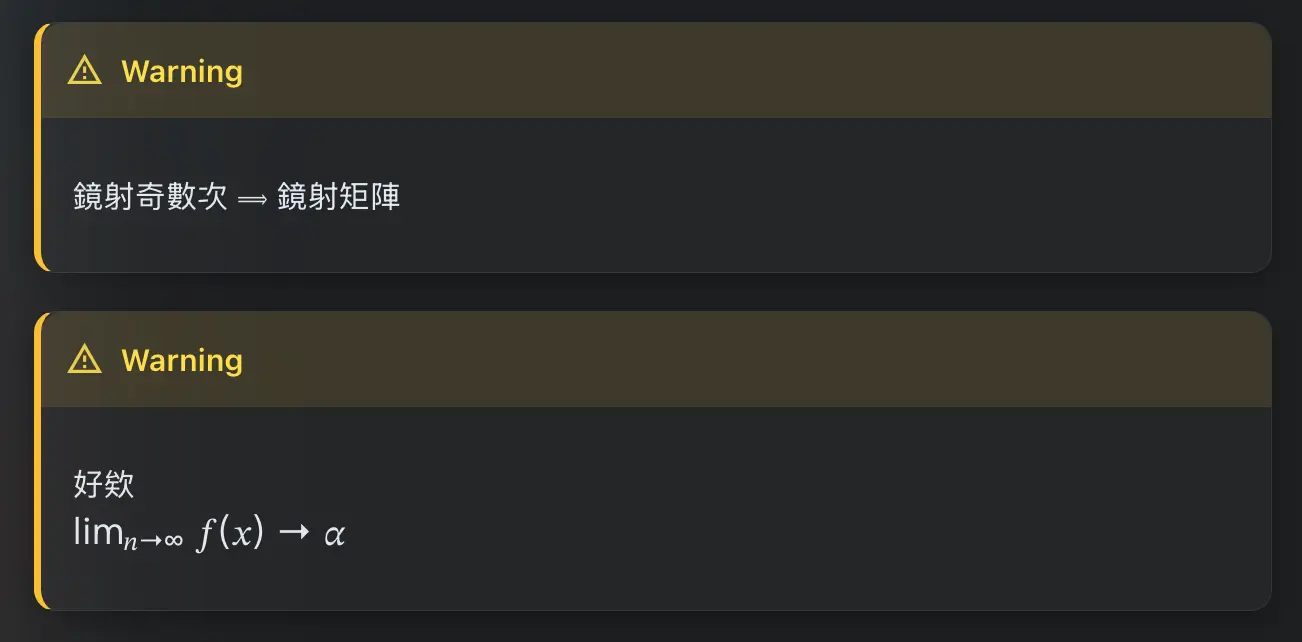
警告提示塊 是 obidian 內建的語法:
1 2 !!! info "title(optional)" content
我發現 hexo 沒有內建這個東西
但是因為 Hexo Admonition New 有多支援一些功能 / type,所以我決定改用這個
其語法是:
1 2 !!! type "title"(optional) content
轉換 一樣叫 Gemini 寫一個轉換的 script:
程式碼
1 2 3 4 5 6 7 8 9 10 11 12 13 14 15 16 17 18 19 20 21 22 23 24 25 26 27 28 29 30 31 32 33 34 35 36 37 38 39 40 41 42 43 44 45 46 47 48 49 50 51 52 53 54 55 56 57 58 59 60 61 62 63 64 65 66 67 68 69 70 71 72 73 74 75 76 77 78 79 80 81 82 83 84 85 86 87 88 89 90 91 92 93 94 95 96 97 98 99 100 101 102 103 104 105 106 107 108 109 110 111 112 113 114 115 116 117 118 119 120 121 122 123 124 125 126 127 128 129 130 131 132 133 134 135 136 137 138 139 140 141 142 143 144 145 146 147 148 149 150 151 152 153 154 155 156 157 158 159 160 161 162 163 164 165 166 167 168 169 170 171 172 173 174 175 176 177 178 179 180 181 182 183 184 /* global hexo */ 'use strict'; /** * Hexo Filter: Convert Obsidian Callouts to hexo-admonition-new syntax * Location: blog/scripts/obsidian_admonition.js */ // hexo-admonition-new 原生支援的類型 const SUPPORTED_TYPES = new Set([ 'anote', 'info', 'todo', 'warning', 'attention', 'caution', 'error', 'failure', 'missing', 'fail', 'danger', 'bug', 'success', 'tip', 'question', 'example', 'quote' ]); // Obsidian 常用 Callout 類型對映表 const TYPE_MAP = { 'note': 'anote', // 避開 CSS note 樣式影響 'seealso': 'anote', 'important': 'warning', // > [!important] 轉為 warning 'abstract': 'info', 'summary': 'info', 'tldr': 'info', 'hint': 'tip', 'check': 'success', 'done': 'success', 'help': 'question', 'faq': 'question', 'cite': 'quote' }; /** * 轉義 Regex 特殊字元 * @param {string} str * @returns {string} */ function escapeRegExp(str) { return str.replace(/[.*+?^${}()|[\]\\]/g, '\\$&'); } /** * 遞迴解析並轉換 Obsidian Callout 語法為 hexo-admonition-new 格式 * 自動消除多餘空格並精準縮進 4 個空格(支援多層嵌套) * @param {string[]} lines * @returns {string[]} */ function parseCallouts(lines) { const result = []; let i = 0; while (i < lines.length) { const line = lines[i]; // 匹配 Obsidian Callout 起始行:例如 > [!important] 或 > [!note]+ 標題 const calloutMatch = line.match(/^(\s*)>\s*\[!([a-zA-Z0-9_\-]+ )\]([\+\-]?)(?:[ \t]+(.*))?$/); if (calloutMatch) { const indent = calloutMatch[1] || ''; const rawType = calloutMatch[2].toLowerCase(); const foldSign = calloutMatch[3]; // '+' 或 '-' 或 '' const rawTitle = calloutMatch[4] ? calloutMatch[4].trim() : ''; let targetType = null; let targetTitle = rawTitle; // 檢查類型支援與轉換邏輯 if (SUPPORTED_TYPES.has(rawType)) { targetType = rawType; } else if (TYPE_MAP[rawType]) { targetType = TYPE_MAP[rawType]; } else { // 不支援的類型特別處理:降級為 'info' 類型 targetType = 'info'; if (!targetTitle) { targetTitle = rawType.charAt(0).toUpperCase() + rawType.slice(1); } } // 判斷折疊語法 (!!!, !!!+, !!!-) let prefix = '!!!'; if (foldSign === '+') { prefix = '!!!+'; } else if (foldSign === '-') { prefix = '!!!-'; } // 組合標頭行 let headerLine = `${indent}${prefix} ${targetType}` ; if (targetTitle !== '') { const escapedTitle = targetTitle.replace(/"/g, '\\"'); headerLine += ` "${escapedTitle}"` ; } result.push(headerLine); // 收集屬於目前 Callout 內部的所有行(剝離 > 符號) const rawBodyLines = []; const continuationRegex = new RegExp( `^${escapeRegExp(indent)}>(.*)$` ); i++; while (i < lines.length) { const currentLine = lines[i]; const contMatch = currentLine.match(continuationRegex); if (contMatch) { rawBodyLines.push(contMatch[1] !== undefined ? contMatch[1] : ''); i++; } else { break; } } // 計算區塊內非空行的最小前導空格數,以進行自動對齊(Dedent) let minIndent = Infinity; for (const bLine of rawBodyLines) { if (bLine.trim().length > 0) { const match = bLine.match(/^[ \t]*/); const leadingSpaces = match ? match[0].length : 0; if (leadingSpaces < minIndent) { minIndent = leadingSpaces; } } } if (minIndent === Infinity) minIndent = 0; // 剔除多餘的前導空格,歸一化縮進 const dedentedBodyLines = rawBodyLines.map(bLine => { if (bLine.trim().length === 0) return ''; return bLine.slice(minIndent); }); // 遞迴處理內部內容(若有嵌套 Callout 亦可正確處理) const processedBody = parseCallouts(dedentedBodyLines); // 為內部所有內容統一補上 4 個空格縮進 for (const bodyLine of processedBody) { if (bodyLine.length === 0) { result.push( `${indent} ` ); } else { result.push( `${indent} ${bodyLine}` ); } } } else { result.push(line); i++; } } return result; } /** * 主轉換函式 * @param {string} content * @returns {string} */ function convertObsidianCallouts(content) { if (!content) return content; const lines = content.split(/\r?\n/); const processedLines = parseCallouts(lines); return processedLines.join('\n'); } // 註冊 Hexo 渲染前過濾器 hexo.extend.filter.register('before_post_render', function(data) { if (data && data.content) { data.content = convertObsidianCallouts(data.content); } return data; }, 1);
調整配色 從 README 把 CSS 放到某個路徑(例: blog/css )_comfig_stellar.yml 中的 inject.head 再加一項 `-
成品:
優化連結 參考資料:
我是選擇用插件,感覺配置比較無腦
hexo-abbrlink 是用 crc 算法(一種類似 Hash 的校驗算法)
缺點是有篇數上限(但是 crc16 上限 65535 篇文章想到達也不是一件容易事情)
hexo-abbrlink 是用數字編號
但編號我擔心會有順序時間等混亂的情形,而且長度會不規律hexo-abbrlinkalg & rep)
Obsidian Enveloppe Enveloppe 是一個 obsidian 插件,可以將已有文章 push 到 GitHub repo 上面自行 merge
基礎設定:
file tree in the directory:Fixed
root folder: source/_posts
attatchmemt:
plugins:
Template
Enveloppe :
其實在設定就用好幾乎不用在 front matter 作 Override
只需要 share(checkox)就好
Hexo:
參考資料: https://hexo.io/docs/front-matter
date / updated:見 [[用 stellar 主題翻新 blog#Date/Update|時間紀錄插件]]
comments (optional)
tags、categories
主題:Stellar
見 https://xaoxuu.com/wiki/stellar/front-matter/
有巢狀的 frontmatter 要編輯:用 obsidian-nested-properties 編輯
我的 template:
1 2 3 4 5 6 7 8 9 10 11 12 13 14 15 16 17 --- title: share: false modified: 2026 /08/05T14:49:51+08:00 date: 2026-07-28 21:47:44+08:00 comments: true tags: categories: cover: /images poster: headline: "" description: mermaid: true katex: true mathjax: true banner: /images/ ---
Date/Update Obsidian 插件:
這樣每次開啟新文件 / 編輯就會自己生成 or 修改時間
Stellar(主題) 因為這個主題他有很多自定義的標籤跟 Widget,雖然有人作了即時顯示在 Obsidian 的標籤,但覆蓋率還沒有到很好,為了保持 Obsidian 這邊的觀看效果,所以我決定都先不用
網站上線 GitHub 託管 GitHub 有免費的託管功能 GitHub page 能夠讓靜態網站直接架設在 GitHub 上而且還有網域,建議白嫖起來。
官方文章:
官方的方式是放一個 GitHub Action,然後讓 GitHub Page 抓 Action 的生成物。
阿我自己偏好讓生成的東西在新的 branch,這樣比較好 debug。
程式碼(modify by AI)
1 2 3 4 5 6 7 8 9 10 11 12 13 14 15 16 17 18 19 20 21 22 23 24 25 26 27 28 29 30 31 32 33 34 35 36 37 38 39 40 41 42 43 44 45 name: deploy_page_to_gh-pages on: push: branches: - main workflow_dispatch: permissions: contents: write jobs: build-and-deploy: runs-on: ubuntu-latest steps: - uses: actions/checkout@v4 with: token: ${{ secrets.GITHUB_TOKEN }} submodules: recursive - name: Use Node.js 20 uses: actions/setup-node@v4 with: node-version: "20" - name: Cache NPM dependencies uses: actions/cache@v4 with: path: node_modules key: ${{ runner.OS }}-npm-cache restore-keys: | ${{ runner.OS }}-npm-cache - name: Install Dependencies run: npm install - name: Build run: npm run build - name: Deploy to Target Branch uses: peaceiris/actions-gh-pages@v4 with: github_token: ${{ secrets.GITHUB_TOKEN }} publish_dir: ./public publish_branch: gh-pages
Domain 可以參照這篇文章